You just got a huge spike in web traffic. Woohoo! Now what?
First of all, give yourself a pat on the back for getting a ton of visitors to your site! Many people struggle with traffic in the beginning. You may have had a social post go viral, a popular article link to you, or an influencer with a mass following share your post.
But… Was your site prepared for the traffic? Did you see a jump in sales? Did you capture any leads?
If your site wasn’t optimized to convert, don’t worry. Not all hope is lost… yet.
The Facebook Pixel
Did you have the Facebook retargeting pixel installed on your site? This could be your golden ticket! If you’re not sure if it’s installed, download the Facebook Pixel Chrome Extension now to check.
Once you download it, go to your website and click on the extension. If it shows PageView and the correct pixel ID number… ding, ding, ding! You’re in business.
![]()
To check to make sure your pixel ID is accurate, go to the pixels page in your Facebook ads account to match up the number. Double check you’re looking at the right account in the top left dropdown.
![]()
If it says no pixels found on this page… womp, you’re out of luck this time. If this is you, stop reading this and set up your pixel NOW! Download my easy step by step guide to install your Facebook retargeting pixels in 5 minutes.
![]()
Retargeting Audiences
Now it’s time to convert those visitors. Let’s setup some basic custom audiences on Facebook.
Here are some starter audiences to set up:
- All Website Visitors – 180 Days
- All Website Visitors – 30 Days
- All Website Visitors – 7 Days
- Purchased – 180 Days
- Purchased – 30 Days
- Purchased – 7 Days
- Email List
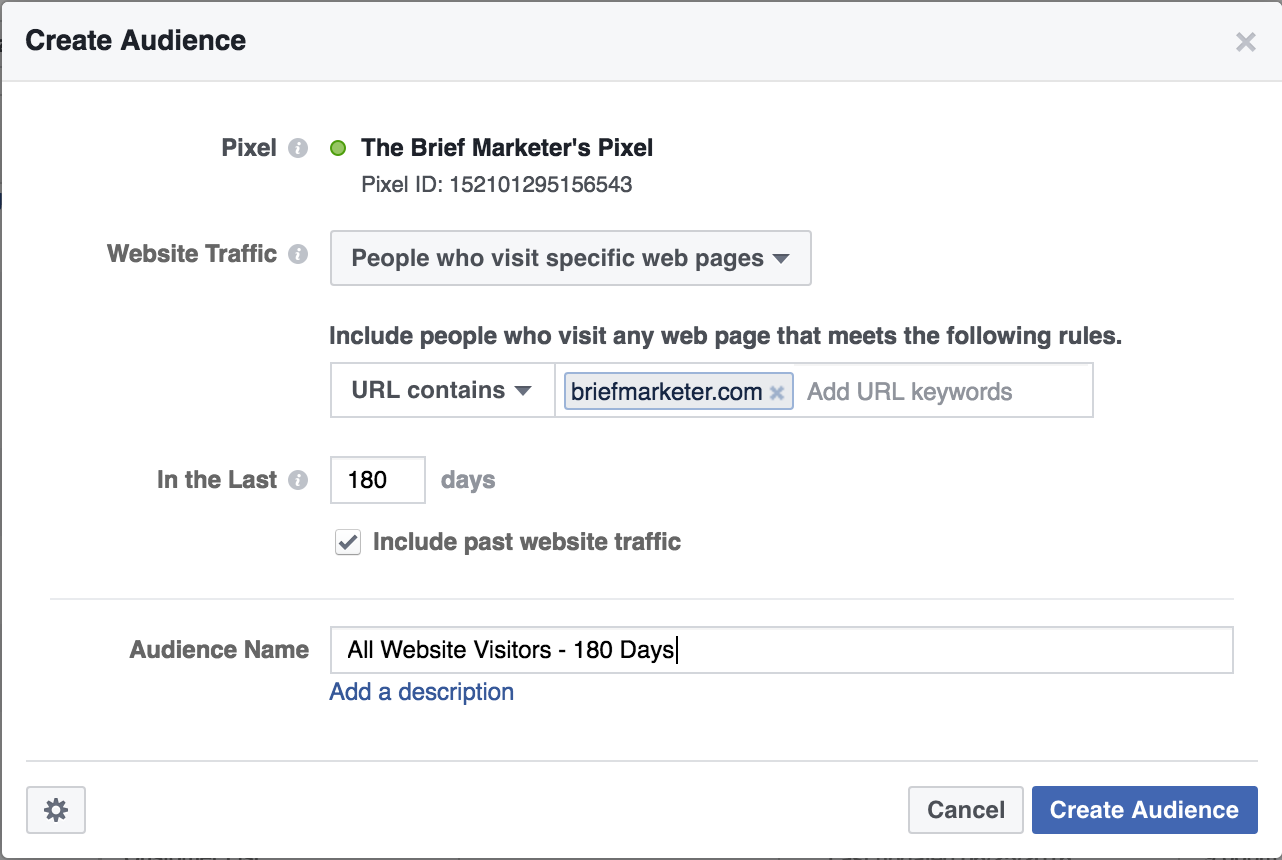
In your Facebook ads account go to the audiences page. Go to Create Audience -> Custom Audience -> Website Traffic.
Create a new custom audience for “people who visit specific web pages” and put in your website in this format: briefmarketer.com. Set the time frame for 180 days (the max Facebook currently allows) and save. Repeat this for 30 days and 7 days.

For the purchased audiences, you’ll do the same thing but include the unique url people hit after buying your product (or opt-in, sign-up, registration… whatever the goal is). That url might look like this: briefmarketer.com/cart/thank-you.html.
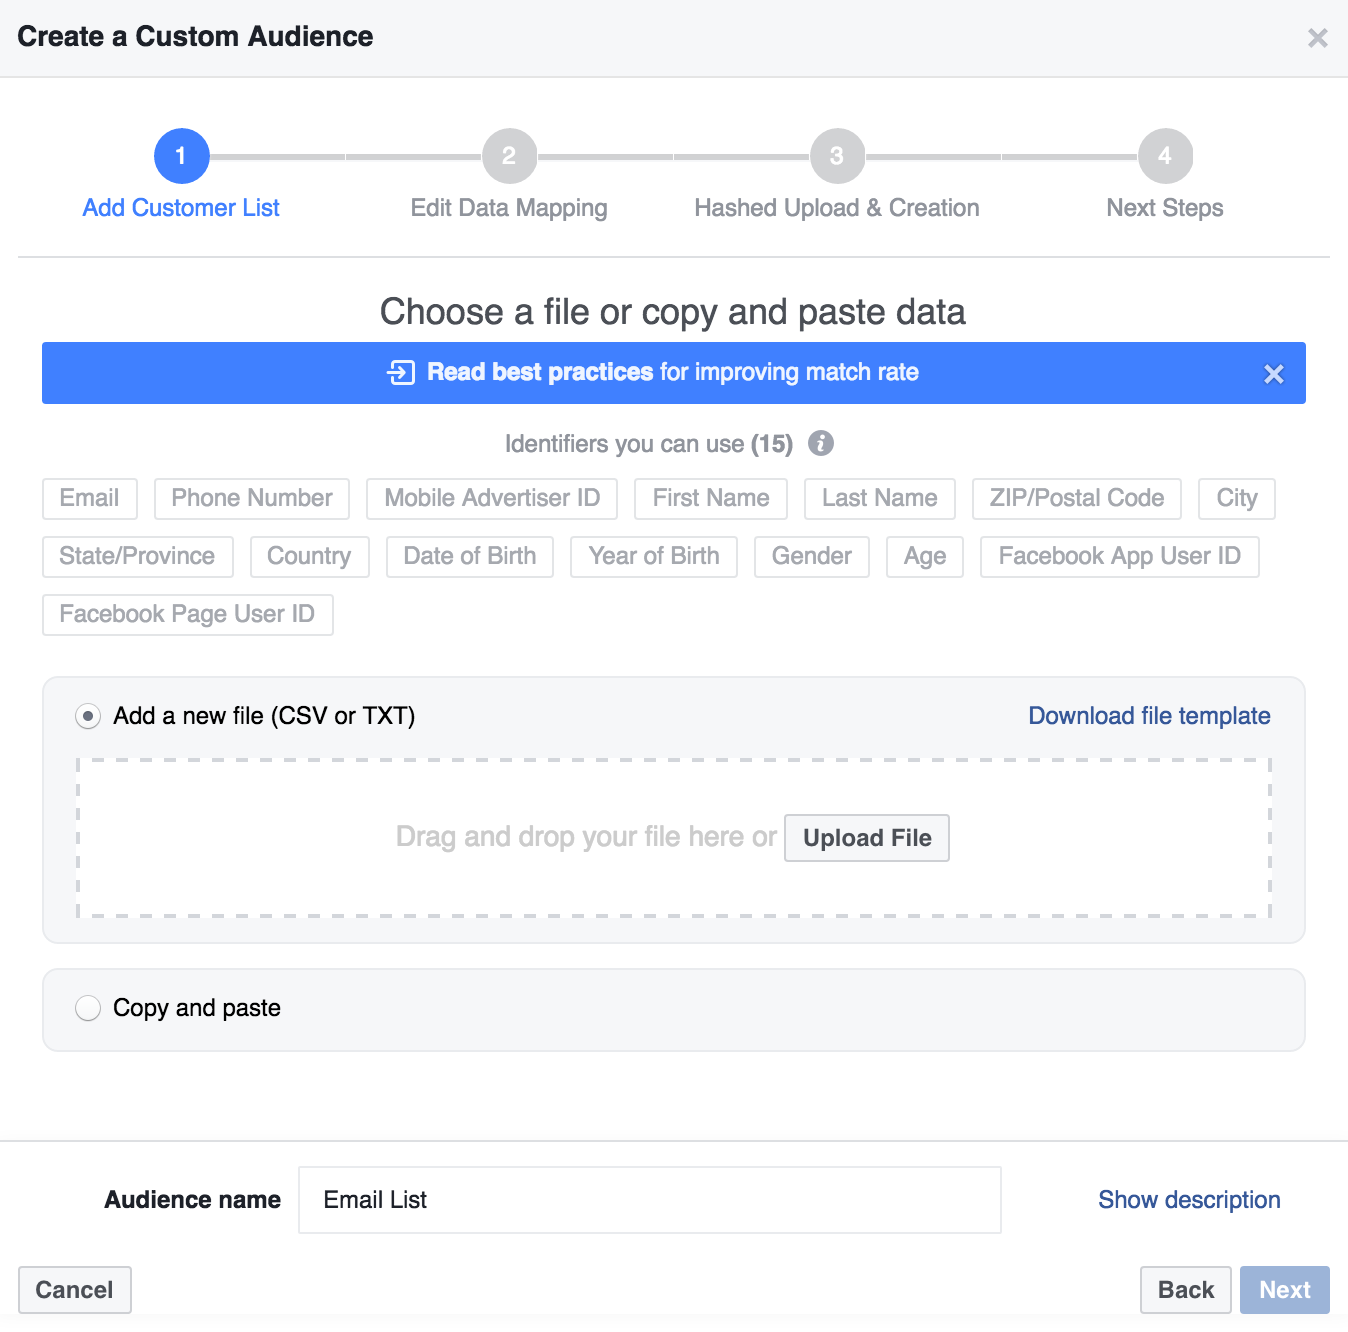
Finally, create a new audience by uploading your current email list if you have one. Go to Create Audience -> Custom Audience -> Customer File. You can either upload your file via a .CSV file or copy and paste your list. I do NOT recommend using the import from Mailchimp option as you can’t currently update lists created that way.

Other audience ideas to consider setting up are anyone who hit your cart page in X days, anyone who hit your blog in X days, or anyone who hit your landing/sales page in X days.
Retargeting Campaigns
Now that you’ve created a few basic Facebook audiences, you can set up your first retargeting campaigns.
The goal of this campaign is to show a relevant ad to your website visitors to get them to take action that they didn’t take on their first visit.
- In your Ads Manager create a new campaign called “Retargeting”.
- Set the custom targeting of the ad set to include the custom audience: All Website Visitors – 180, and exclude: Purchased – 180 Days (or opt-ins, or registrations, or whatever the goal). You can also exclude your existing email list, and fans of your page since you’re trying to get new people who aren’t already connected to you.
- Name the ad set “All Website Visitors – 180”.
Your ad could direct people to a sales page, a landing page to collect an email, a lead ad to collect an email or other info, or simply more content to keep them engaged.
Set up multiple ad sets in your campaign to test different audiences, offers or ad creative. Is it cheaper for you to collect an email address from the All Visitors – 180 Days audience or the All Visitors – 30 days audience? Is it cheaper to send people to a landing page or to a lead ad?
Try an abandoned cart campaign by targeting people who hit your cart page but did not reach the thank you page.
The Email List
Did you collect new email addresses? If yes, great! Now don’t let them die. The number one mistake businesses make when it comes to email lists is… not emailing their list. Go figure!
A simple way to make sure leads aren’t neglected is setting up an autoresponder when they join or setting up an automated welcome series.
If that’s not your cup of tea, sending out a weekly email will do the trick. But if you only send out emails once every few months, this is a surefire way for people to forget who you are entirely and unsubscribe. Consistency and expectations are key when it comes to emails.
Opt-In Forms
If you didn’t have anything set up to collect email addresses, consider adding something immediately. One quick and easy tool to use is SumoMe. You can easily collect emails through options such as pop-ups, hello bars, sliding boxes, welcome mats, etc.
Just make sure you don’t over do it! Let the people have an opportunity to give their email, but don’t bombard and annoy them.
In the free version, you will have to periodically export the emails to upload to your email provider. If you upgrade, you can auto sync the emails to your provider.
Conclusion
Even if you don’t have huge or consistent traffic days yet, you’ll benefit from being prepared. Set up your foundation for pixels now (this strategy also applies to other platforms like Google AdWords, Twitter, etc.) and make sure people have the opportunity to opt-in to your email list from your website.
Take it one step further by setting up email list welcome autoresponders and your Facebook retargeting campaigns. When the time comes that you’re generating enough traffic, all you’ll have to do is flip the switch to start them up!